SDK Documentation
Cuti-E provides native SDKs for iOS and Android that let you collect user feedback directly in your mobile app. The SDKs handle creating conversations, sending messages, and receiving push notifications - all with minimal code.
Getting Started: You need an App ID from the Admin Dashboard.
Go to Settings → Apps to create your app and get your App ID.
Quick Start
Choose your platform to get started in under 5 minutes:
1. Add the Package
In Xcode, go to File → Add Package Dependencies and enter:
https://github.com/cuti-e/ios-sdk2. Configure the SDK
import CutiE

// In AppDelegate or @main App
CutiE.shared.configure(appId: "app_your_app_id_here")
3. Show Feedback Form
import SwiftUI
import CutiE

struct ContentView: View {
    @State private var showFeedback = false

    var body: some View {
        Button("Send Feedback") {
            showFeedback = true
        }
        .sheet(isPresented: $showFeedback) {
            CutiEFeedbackView { conversationId in
                print("Submitted: \(conversationId)")
            }
        }
    }
}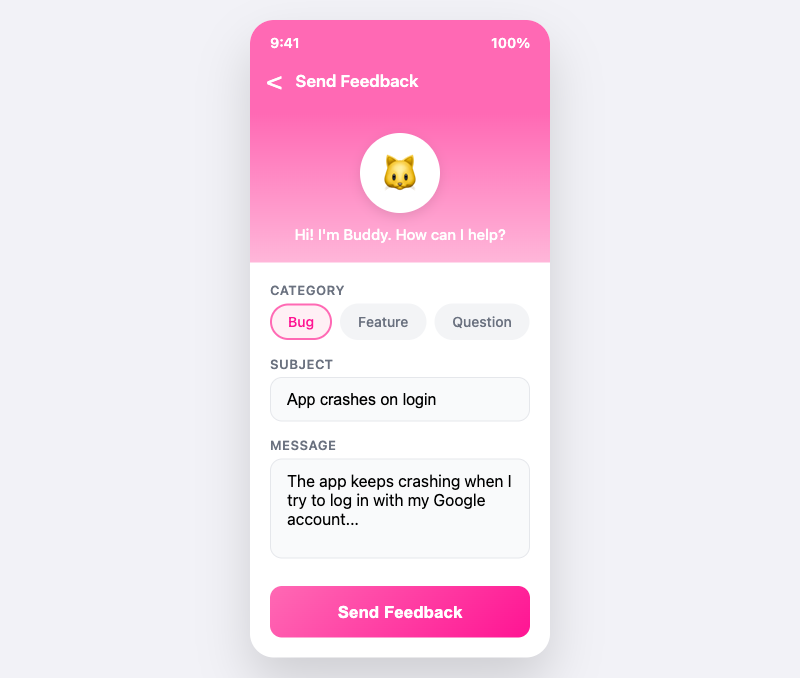
The feedback form allows users to submit bug reports, feature requests, and general feedback.
1. Add the Dependency
In your settings.gradle.kts, add JitPack:
dependencyResolutionManagement {
    repositories {
        maven { url = uri("https://jitpack.io") }
    }
}
Then add the dependency in build.gradle.kts:
dependencies {
    implementation("com.github.Stig-Johnny.cutie:cutie:1.0.0")
}
2. Configure the SDK
import com.cutie.sdk.CutiE

// In your Application class
class MyApplication : Application() {
    override fun onCreate() {
        super.onCreate()
        CutiE.getInstance(this).configure(
            appId = "app_your_app_id_here"
        )
    }
}
3. Show Feedback Form
import com.cutie.sdk.CutiEFeedbackView

@Composable
fun MyScreen() {
    var showFeedback by remember { mutableStateOf(false) }

    Button(onClick = { showFeedback = true }) {
        Text("Send Feedback")
    }

    if (showFeedback) {
        CutiEFeedbackView(
            onDismiss = { showFeedback = false },
            onSuccess = { conversationId ->
                println("Submitted: $conversationId")
            }
        )
    }
}
Configuration Options
| Option | Type | Description |
|---|---|---|
appId |
String | Your App ID from the admin dashboard (required) |
apiURL |
String | API endpoint (default: production server) |
Testing: Use the sandbox environment for development:
apiURL: "https://cutie-worker-sandbox.invotekas.workers.dev"
iOS Installation
Swift Package Manager
Add Cuti-E to your project using Xcode:
- File → Add Package Dependencies...
- Enter:
https://github.com/cuti-e/ios-sdk - Choose version or branch
- Add to your target
Manual Installation
Add to your Package.swift:
dependencies: [
    .package(url: "https://github.com/cuti-e/ios-sdk.git", from: "1.0.104")
],
targets: [
    .target(
        name: "YourTarget",
        dependencies: ["CutiE"]
    )
]
Requirements
- iOS 15.0+ / macOS 12.0+
- Swift 5.9+
- Xcode 15.0+
iOS Basic Usage
Create a Conversation (Callback)
CutiE.shared.createConversation(
    category: .bug,
    message: "The app crashes when I tap save",
    title: "Crash on Save"
) { result in
    switch result {
    case .success(let conversationId):
        print("Created: \(conversationId)")
    case .failure(let error):
        print("Error: \(error.localizedDescription)")
    }
}
List Conversations (iOS 15+)
// Using async/await
let conversations = try await CutiE.shared.getConversations()
for conv in conversations {
    print("\(conv.title ?? "Untitled") - \(conv.status)")
}
Send a Message (iOS 15+)
// Using async/await
let message = try await CutiE.shared.sendMessage(
    conversationId: "conv_abc123",
    message: "Thanks for the help!"
)
iOS Feedback View
The SDK includes a ready-to-use SwiftUI feedback form:
import SwiftUI
import CutiE

struct SettingsView: View {
    @State private var showFeedback = false

    var body: some View {
        List {
            Button("Send Feedback") {
                showFeedback = true
            }
        }
        .sheet(isPresented: $showFeedback) {
            CutiEFeedbackView { conversationId in
                // Called when feedback is submitted
                print("Created conversation: \(conversationId)")
            }
        }
    }
}
iOS In-app Inbox
Let users view their feedback conversations and admin replies directly in your app (iOS 15+).
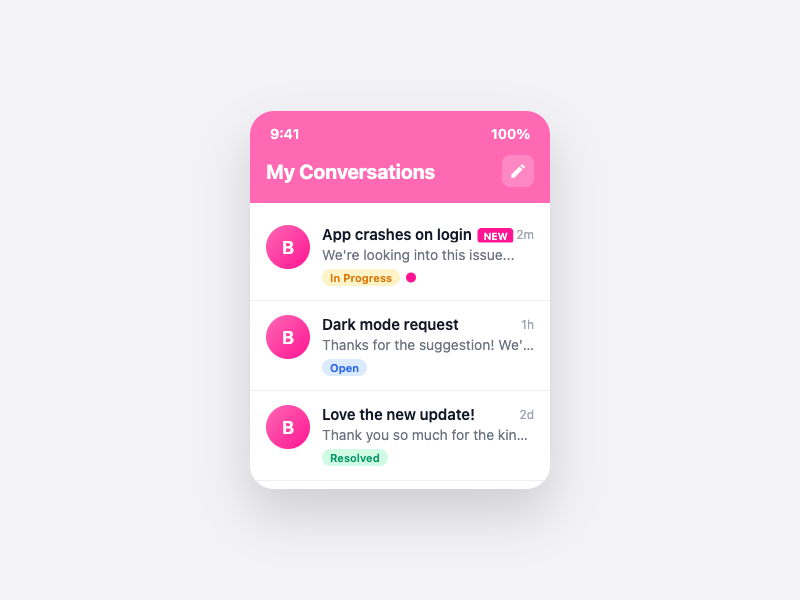
The inbox shows all conversations and allows users to continue chatting with support.
UX Best Practice: Add an inbox icon to your navigation bar so users can easily access their feedback from anywhere in your app. Don't bury it deep in Settings!
Recommended: Navigation Bar Icon with Badge
Add a persistent inbox icon with an unread message badge in your main view's navigation bar:
import SwiftUI
import CutiE

struct MainView: View {
    @State private var showInbox = false
    @State private var showFeedback = false
    @State private var unreadCount = 0

    var body: some View {
        NavigationView {
            YourContentView()
                .navigationTitle("Home")
                .toolbar {
                    ToolbarItem(placement: .navigationBarTrailing) {
                        HStack(spacing: 16) {
                            // Inbox button with badge
                            Button { showInbox = true } label: {
                                ZStack(alignment: .topTrailing) {
                                    Image(systemName: "tray.full")

                                    if unreadCount > 0 {
                                        Text(unreadCount > 99 ? "99+" : "\(unreadCount)")
                                            .font(.system(size: 10, weight: .bold))
                                            .foregroundColor(.white)
                                            .padding(.horizontal, 5)
                                            .padding(.vertical, 2)
                                            .background(Color.red)
                                            .clipShape(Capsule())
                                            .offset(x: 8, y: -8)
                                    }
                                }
                            }

                            // Submit feedback button
                            Button { showFeedback = true } label: {
                                Image(systemName: "exclamationmark.bubble")
                            }
                        }
                    }
                }
                .sheet(isPresented: $showInbox) {
                    CutiEInboxView()
                }
                .sheet(isPresented: $showFeedback) {
                    CutiEFeedbackView { _ in }
                }
                .task {
                    await loadUnreadCount()
                }
        }
    }

    private func loadUnreadCount() async {
        guard CutiE.shared.isConfigured else { return }
        do {
            unreadCount = try await CutiE.shared.getUnreadCount()
        } catch {
            print("Failed to load unread count: \(error)")
        }
    }
}
Alternative: Settings Menu
struct SettingsView: View {
    @State private var showInbox = false

    var body: some View {
        List {
            Button("My Feedback") {
                showInbox = true
            }
        }
        .sheet(isPresented: $showInbox) {
            CutiEInboxView()
        }
    }
}
UIKit Integration
// Present inbox modally from any view controller
CutiE.shared.showInbox()

// Or from a specific view controller
CutiE.shared.showInbox(from: viewController)
Async/Await API
// Get all conversations
let conversations = try await CutiE.shared.getConversations()

// Get single conversation with messages
let conversation = try await CutiE.shared.getConversation(id: "conv_abc123")

// Send a reply
let message = try await CutiE.shared.sendMessage(
    conversationId: "conv_abc123",
    message: "Thanks for the help!"
)

// Get unread message count (for badge display)
let unreadCount = try await CutiE.shared.getUnreadCount()
Android Installation
Gradle (via JitPack)
Add JitPack to your root settings.gradle.kts:
dependencyResolutionManagement {
    repositories {
        google()
        mavenCentral()
        maven { url = uri("https://jitpack.io") }
    }
}
Add the dependency to your app's build.gradle.kts:
dependencies {
    implementation("com.github.Stig-Johnny.cutie:cutie:1.0.0")
}
Requirements
- Android 7.0 (API 24) or higher
- Kotlin 1.9+
- Gradle 8.0+
Android Basic Usage
Create a Conversation
CutiE.getInstance(context).createConversation(
    category = ConversationCategory.BUG,
    message = "The app crashes when I tap save",
    title = "Crash on Save"
) { result ->
    result.onSuccess { conversation ->
        println("Created: ${conversation.id}")
    }.onFailure { error ->
        println("Error: ${error.message}")
    }
}
List Conversations
CutiE.getInstance(context).listConversations { result ->
    result.onSuccess { conversations ->
        conversations.forEach { conv ->
            println("${conv.title} - ${conv.status}")
        }
    }
}
Send a Message
CutiE.getInstance(context).sendMessage(
    message = "Thanks for the help!",
    conversationID = "conv_abc123"
) { result ->
    // Handle result
}
Android Feedback View
The SDK includes a Jetpack Compose feedback form:
import com.cutie.sdk.CutiEFeedbackView

@Composable
fun SettingsScreen() {
    var showFeedback by remember { mutableStateOf(false) }

    Button(onClick = { showFeedback = true }) {
        Text("Send Feedback")
    }

    if (showFeedback) {
        Dialog(onDismissRequest = { showFeedback = false }) {
            Surface(shape = MaterialTheme.shapes.large) {
                CutiEFeedbackView(
                    onDismiss = { showFeedback = false },
                    onSuccess = { conversationId ->
                        println("Created: $conversationId")
                    }
                )
            }
        }
    }
}
Android In-app Inbox
Let users view their feedback conversations and admin replies directly in your app.
The inbox shows all conversations and allows users to continue chatting with support.
UX Best Practice: Add an inbox icon to your navigation bar so users can easily access their feedback from anywhere in your app. Don't bury it deep in Settings!
Basic Usage
import com.cutie.sdk.views.CutiEInboxView
import com.cutie.sdk.views.CutiEConversationView

@Composable
fun SettingsScreen() {
    var showInbox by remember { mutableStateOf(false) }
    var selectedConversation by remember { mutableStateOf<Conversation?>(null) }

    Button(onClick = { showInbox = true }) {
        Text("My Feedback")
    }

    if (showInbox) {
        Dialog(
            onDismissRequest = { showInbox = false },
            properties = DialogProperties(usePlatformDefaultWidth = false)
        ) {
            Surface(
                modifier = Modifier.fillMaxSize(),
                shape = MaterialTheme.shapes.large
            ) {
                CutiEInboxView(
                    onDismiss = { showInbox = false },
                    onConversationSelected = { conversation ->
                        selectedConversation = conversation
                    }
                )
            }
        }
    }

    // Show conversation detail when selected
    selectedConversation?.let { conversation ->
        Dialog(
            onDismissRequest = { selectedConversation = null },
            properties = DialogProperties(usePlatformDefaultWidth = false)
        ) {
            Surface(
                modifier = Modifier.fillMaxSize(),
                shape = MaterialTheme.shapes.large
            ) {
                CutiEConversationView(
                    conversationId = conversation.conversationId,
                    onDismiss = { selectedConversation = null }
                )
            }
        }
    }
}
Navigation Bar with Badge
Add an inbox icon with unread count badge to your app bar:
@Composable
fun MainScreen() {
    var showInbox by remember { mutableStateOf(false) }
    var unreadCount by remember { mutableStateOf(0) }

    // Load unread count on launch
    LaunchedEffect(Unit) {
        CutiE.instance?.getUnreadCount { result ->
            result.onSuccess { unreadCount = it }
        }
    }

    Scaffold(
        topBar = {
            TopAppBar(
                title = { Text("My App") },
                actions = {
                    // Inbox button with badge
                    IconButton(onClick = { showInbox = true }) {
                        BadgedBox(
                            badge = {
                                if (unreadCount > 0) {
                                    Badge { Text(unreadCount.toString()) }
                                }
                            }
                        ) {
                            Icon(Icons.Default.Inbox, "Feedback Inbox")
                        }
                    }
                }
            )
        }
    ) { padding ->
        // Your content here
    }

    // Show inbox dialog
    if (showInbox) {
        // ... same as above
    }
}
Callback API
// List all conversations
CutiE.instance?.listConversations { result ->
    result.onSuccess { conversations ->
        conversations.forEach { println("${it.title} - ${it.status}") }
    }
    result.onFailure { error ->
        println("Error: ${error.message}")
    }
}

// Get single conversation with messages
CutiE.instance?.getConversation(conversationId) { result ->
    result.onSuccess { conversation ->
        conversation.messages?.forEach { println(it.message) }
    }
}

// Send a reply
CutiE.instance?.sendMessage(conversationId, "Thanks!") { result ->
    result.onSuccess { message -> println("Sent: ${message.messageId}") }
}

// Get unread count for badge
CutiE.instance?.getUnreadCount { result ->
    result.onSuccess { count -> updateBadge(count) }
}
Conversation API
Categories
| Category | Description |
|---|---|
bug | Bug reports |
feature | Feature requests |
question | Questions |
feedback | General feedback |
other | Other |
Statuses
| Status | Description |
|---|---|
open | New, unassigned |
in_progress | Being worked on |
waiting_user | Waiting for user response |
waiting_admin | Waiting for admin response |
resolved | Issue resolved |
closed | Conversation closed |
Message API
Sender Types
| Type | Description |
|---|---|
user | Message from app user |
admin | Message from support admin |
system | Automated system message |
Push Notifications
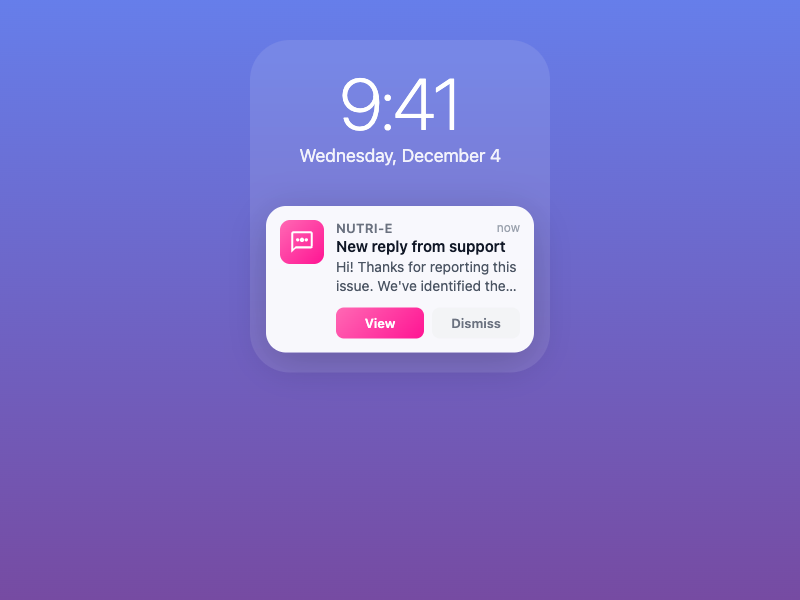
Users receive push notifications when admins reply to their feedback.
Important: Push notifications require setup in three places: Xcode, Apple Developer Portal, and the Admin Dashboard. See the complete setup guide for step-by-step instructions.
iOS (APNs)
import UserNotifications
import CutiE

// 1. Request permission (in app startup)
CutiE.shared.pushNotifications.requestPermission { granted in
    print("Push notifications \(granted ? "enabled" : "denied")")
}

// 2. In AppDelegate, forward the device token to CutiE
func application(_ application: UIApplication,
    didRegisterForRemoteNotificationsWithDeviceToken deviceToken: Data) {
    CutiE.shared.pushNotifications.didRegisterForRemoteNotifications(withDeviceToken: deviceToken)
}

func application(_ application: UIApplication,
    didFailToRegisterForRemoteNotificationsWithError error: Error) {
    CutiE.shared.pushNotifications.didFailToRegisterForRemoteNotifications(withError: error)
}

// 3. Clear badge when app becomes active (SwiftUI)
@Environment(\.scenePhase) private var scenePhase

.onChange(of: scenePhase) { newPhase in
    if newPhase == .active {
        CutiE.shared.pushNotifications.clearBadgeCount()
    }
}
Push Notification Setup Screenshots
For detailed setup instructions with screenshots, see the iOS SDK Push Notifications Guide.
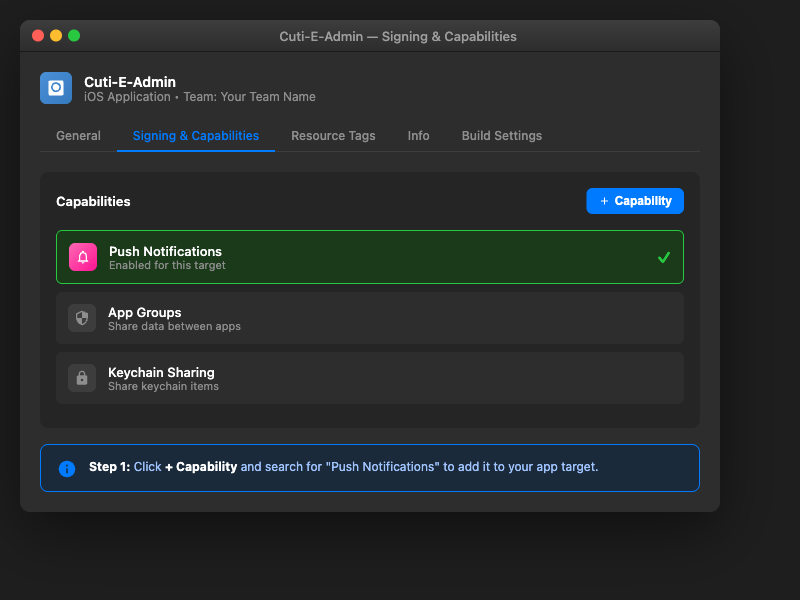
Enable Push Notifications capability in Xcode
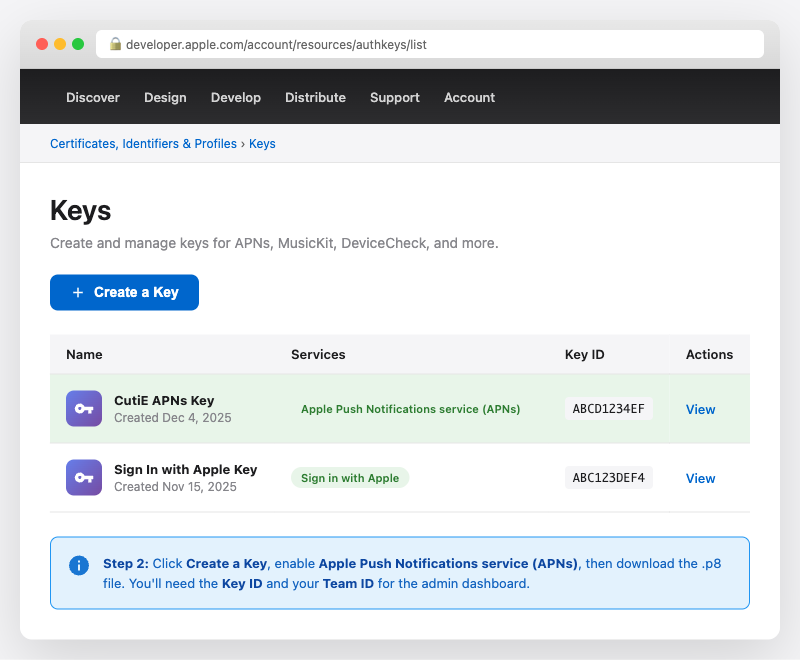
Create APNs key in Apple Developer Portal

Configure APNs in Cuti-E Admin Dashboard
Android (FCM)
import com.google.firebase.messaging.FirebaseMessaging
import com.cutie.sdk.CutiE

FirebaseMessaging.getInstance().token.addOnCompleteListener { task ->
    if (task.isSuccessful) {
        CutiE.getInstance(context).registerPushToken(task.result) { result ->
            result.onSuccess {
                println("Push token registered")
            }
        }
    }
}Authentication Overview
Cuti-E supports three authentication methods, each designed for different use cases:
| Method | Used By | How It Works |
|---|---|---|
| Session Token | Admin Dashboard, iOS Admin App | Login with email/password, Apple, or Google. Full access to team resources. |
| API Key | MCP servers, CI/CD, integrations | Scoped access with optional app restrictions. Created in Settings → API Keys. |
| Device Auth | iOS/Android SDKs | Challenge-response flow using App ID + Device ID. Handled automatically by the SDK. |
When to Use Each Method
| Scenario | Recommended |
|---|---|
| End-user feedback from mobile apps | Device Auth (automatic via SDK) |
| Admin managing conversations in browser | Session Token (login flow) |
| MCP server or AI assistant integration | API Key with minimal scopes |
| CI/CD pipeline reading analytics | API Key with analytics:read scope |
| Webhook or server-to-server integration | API Key or OAuth credentials |
API Keys
API keys provide scoped, long-lived access for integrations, MCP servers, and automation. Keys are created in the Admin Dashboard under Settings → API Keys.
Creating an API Key
- Go to Admin Dashboard → Settings
- Scroll to the API Keys section
- Click + New API Key
- Enter a descriptive name (e.g., “MCP Server”)
- Select the scopes your integration needs (see Scopes Reference)
- Optionally restrict to specific apps
- Set an expiry period (required for scoped keys)
- Click Create and copy the key immediately — it is only shown once
Important: The full API key is only displayed once at creation time. Store it securely. If you lose it, revoke the key and create a new one.
Key Format
ck_live_a1b2c3d4e5f6g7h8i9j0k1l2m3n4o5p6
├────┤├──┤├──────────────────────────────┤
  │    │              │
  │    │   Random token (high entropy)
  │    │
  │    Environment ("live" — currently always live)
  │
  Prefix (ck = "cutie key")
Using API Keys
Send the key in the Authorization header with all API requests:
curl -H "Authorization: Bearer ck_live_a1b2c3..." \
  https://api.cuti-e.com/v1/conversations
API Key Endpoints
| Method | Endpoint | Auth | Description |
|---|---|---|---|
POST | /v1/admin/api-keys | Session | Create a new API key |
GET | /v1/admin/api-keys | Session | List all API keys |
DELETE | /v1/admin/api-keys/:keyId | Session | Revoke an API key |
GET | /v1/auth/token/verify | Session / API Key / OAuth | Verify token and view metadata |
Create API Key (Request)
POST /v1/admin/api-keys
Content-Type: application/json
Authorization: Bearer <session-token>

{
  "name": "MCP Server",
  "expires_in_days": 90,
  "scopes": ["conversations:read", "messages:read"],
  "app_ids": ["app_abc123"]
}
Create API Key (Response)
{
  "key_id": "akey_x1y2z3",
  "api_key": "ck_live_a1b2c3d4...",
  "key_prefix": "ck_live_a1b2c3d4",
  "name": "MCP Server",
  "scopes": ["conversations:read", "messages:read"],
  "app_ids": ["app_abc123"],
  "expires_at": 1718234567890,
  "created_at": 1710458567890
}
Verify Token
GET /v1/auth/token/verify
Authorization: Bearer ck_live_a1b2c3d4...

// Response
{
  "valid": true,
  "admin_id": "admin_xxx",
  "customer_id": "cust_xxx",
  "type": "api_key",
  "scopes": ["conversations:read", "messages:read"],
  "app_ids": ["app_abc123"],
  "key_id": "akey_x1y2z3"
}
Scopes Reference
Scopes control what an API key can access. Use the minimum scopes needed for your integration.
Conversations & Messages
| Scope | Grants Access To |
|---|---|
conversations:read | List and view conversations |
conversations:write | Update conversation status and priority |
messages:read | Read messages within conversations |
messages:write | Send admin replies to conversations |
Management
| Scope | Grants Access To |
|---|---|
apps:read | List registered apps |
apps:write | Create and update apps |
tags:read | List conversation tags |
tags:write | Create and manage tags |
analytics:read | View conversation and usage analytics |
canned_responses:read | List saved response templates |
canned_responses:write | Create and edit response templates |
Admin
| Scope | Grants Access To |
|---|---|
team:read | List team members and roles |
team:write | Invite, remove, and update team members |
customer:read | View account/billing information |
customer:write | Update account settings |
webhooks:read | List webhook configurations |
webhooks:write | Create and manage webhooks |
App Restrictions
In addition to scopes, API keys can be restricted to specific apps. When app_ids is provided as a non-empty array, the key can only access conversations and data belonging to those apps. For access to all apps in the team, omit app_ids entirely or set it to null (an empty array [] is not accepted).
Error Responses
| Status | Meaning |
|---|---|
401 Unauthorized | Missing, invalid, or expired token |
403 Forbidden | Token valid but lacks required scope for this endpoint |
// 403 Forbidden - insufficient scopes
{
  "error": "Insufficient scope. Required: messages:write"
}
Migration Guide
If your integration uses the legacy api_key field from the customers table, follow these steps to migrate to scoped API keys.
What Changed
| Feature | Legacy Key | Scoped API Key |
|---|---|---|
| Format | Random string | ck_live_... (prefixed) |
| Scopes | Full access | Configurable per key |
| App restrictions | None | Optional per-app targeting |
| Expiry | Never | 1–365 days (configurable) |
| Revocation | Regenerate in settings | Revoke individual keys |
| Audit | No tracking | Last-used timestamp |
| Multiple keys | One per team | Unlimited per team |
Migration Steps
- Create a scoped key in Settings → API Keys with the scopes your integration needs
- Update your integration to use the new
ck_live_...key in theAuthorization: Bearerheader - Test that all operations still work with the new key
- Remove the legacy key from your integration’s configuration
Backward compatibility: Legacy API keys continue to work and provide full access. There is no immediate deadline to migrate, but scoped keys are recommended for better security.
Best Practices
Least Privilege
Only grant the scopes your integration actually needs. For example, an MCP server that reads conversations should use conversations:read and messages:read — not full access.
One Key Per Integration
Create a separate API key for each service or tool. This way, revoking one key doesn’t break other integrations.
| Integration | Recommended Scopes |
|---|---|
| MCP Server (read-only) | conversations:read, messages:read |
| MCP Server (with replies) | conversations:read, conversations:write, messages:read, messages:write |
| Analytics dashboard | analytics:read |
| CI/CD webhook setup | webhooks:read, webhooks:write |
Key Rotation
Set expiry dates and rotate keys before they expire. Create a new key, update your integration, then revoke the old one. This avoids downtime.
Never Commit Keys to Git
Store API keys in environment variables, secret managers (e.g., Bitwarden, 1Password), or CI/CD secrets. Never hardcode them in source code or commit them to version control.
# Environment variable
export CUTIE_API_KEY="ck_live_a1b2c3..."

# Use in your integration
const apiKey = process.env.CUTIE_API_KEY;